This is information that reflects the old ACNS organization structure, from before the Division of IT decoupled from the library and reorganized. It is here as a reference if needed.

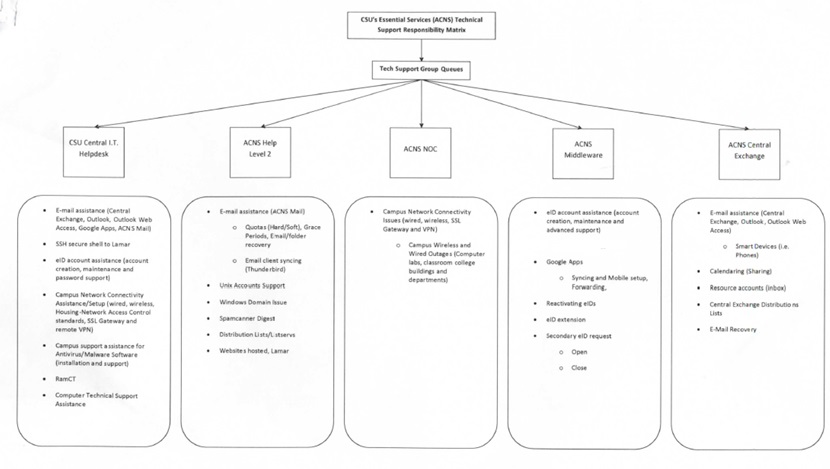
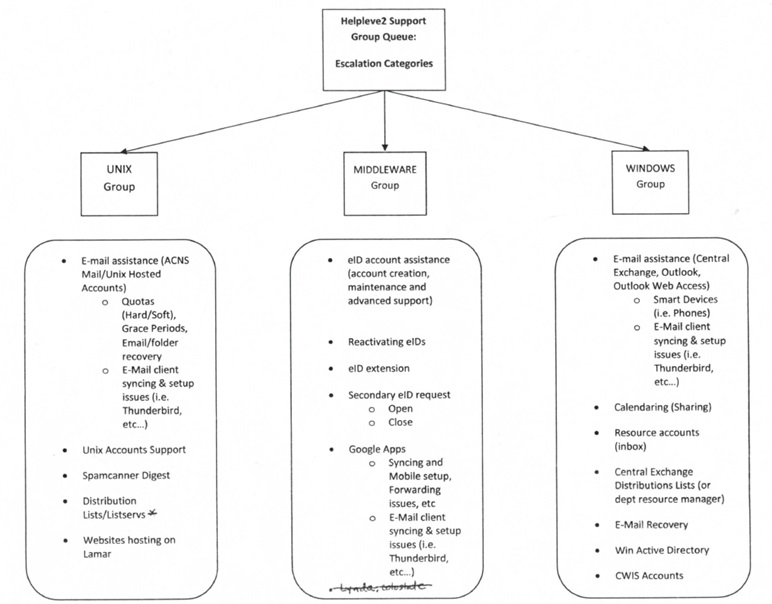
Requests that can't be handled in the call center may require escalation to a more advanced support group when appropriate. These will require the creation of a ticket with detailed patron information, detailed notes explaining the status of the request, and, if necessary, escalation to a further support group. If the request is received via the ticket system the request is edited with additional details to aid the escalation group. If it is received by phone, the ticket must be created from scratch and then escalated. Escalations occur for advanced support as explained in the documents below.
When escalating a request to any support group, you should always put the following in the "Request Detail" or "Tech Notes" field:
Client Name:
Contact Info:
eName:
Status: Pending
Issue:
Escalation: HL2
Staff Members:
1. From the Tickets menu click New Ticket. Click the Ticket Details tab to view ticket information. If the request was received by email, the client information will be populated. If not, proceed to step 2 to assign the client so the client's information will appear in the ticket.

2. Enter the client’s eName in the User Name field of the Client Lookup section. You can use the other fields but they often return multiple results. You may have to check "Search LDAP" before the client will be found. Click Search.

3. Click the client name from the Search Results list. The full client record is displayed and assigned to the request.

4. Enter problem information or review existing information in the Request Detail field. Click the arrow in the Request Type field and choose the appropriate escalation group. Select a category from the second field that best describes the type of support requested. If you put this information in the Request Detail then you don't need to add it in a note as well. You can just skip to step 7 in this guide.
NOTE: The ticket is re-assigned to the appropriate Tech Group based off Request Type selections; the second field is only categorizing the request to better assist the escalation to other support groups.

5. If the ticket already has a request detail then you can add the escalation information in a note. Click the green “+” icon to add a note detailing all troubleshooting activities performed by Help Desk staff. As well as client and escalation information, Techs should also include their first name or initials in the Note details. Also any contact information you can get to the client (in the case of phone requests) can be helpfully added to this field. You should put the information in this format:
Client Name:
Contact Info:
eName:
Status: Pending
Issue:
Escalation: HL2
Staff Members:

6. Click Save to save the note.

7. The ticket Status should be left Open so the ticket will be viewable in the assigned group queue. In the Recipients area the Level 1 Techs box is checked by default to notify the assigned group that a request has been entered in their queue. Click Save & Email.


